
Sig: Práctica: Conversor de Temperaturas Sup: Expresiones Regulares y Análisis Ant: Mozilla Developer Network: Documentación Con:
~/local/src/javascript/PLgrado/temperature(master)]$ git remote -v
github  git@github.com:crguezl/ull-etsii-grado-pl-1213-temperature-converter.git (fetch)
github  git@github.com:crguezl/ull-etsii-grado-pl-1213-temperature-converter.git (push)
origin  ssh://git@bitbucket.org/casiano/pl-grado-temperature-converter.git (fetch)
origin  ssh://git@bitbucket.org/casiano/pl-grado-temperature-converter.git (push)
Hay varias ramas (2015):
[~/local/src/javascript/PLgrado/temperature(master)]$ git branch -a
  gh-pages
  html5pattern
  karma
* master
  remotes/github/gh-pages
  remotes/github/master
  remotes/origin/html5pattern
  remotes/origin/karma
  remotes/origin/master
[~/local/src/javascript/PLgrado/temperature(master)]$
master está la versión mas simple.
html5pattern se muestra como usar el atributo pattern (HTML5)
en el tag input.
En 29/09/2015 está disponible en el remoto github.
Véase también W3Schools.
tests/ en la rama master que hay en GitHub
karma (no visible al alumno, no está en GitHub en 2015) se encuentra como usar Karma para la ejecución de las pruebas.
En una práctica posterior se introduce Karma.
En mi portátil (29/09/2015) un clon del repo se encuentra en:
[~/srcPLgrado/temperature(master)]$ pwd -P
/Users/casiano/local/src/javascript/PLgrado/temperature # 27/01/2014
<html>
  <head>
     <meta http-equiv="Content-Type" content="text/html; charset=UTF-8">
     <title>JavaScript Temperature Converter</title>
     <link href=normalize.css" rel="stylesheet" type="text/css">
     <link href="global.css" rel="stylesheet" type="text/css">

     <script type="text/javascript" src="temperature.js"></script>
  </head>
  <body>
    <h1>Temperature Converter</h1>
    <table>
      <tr>
        <th>Enter  Temperature (examples: 32F, 45C, -2.5f):</th>
        <td><input id="original" autofocus onchange="calculate();" placeholder="32F" size="50"></td>
      </tr>
      <tr>
        <th>Converted Temperature:</th>
        <td><span class="output" id="converted"></span></td>
      </tr>
    </table>
  </body>
</html>
Escribir HTML es farragoso. Una solución es usar algún plugin para su editor favorito.
Emmet existe para diversos editores, entre ellos para
<input> elements are used within a <form> element to declare input controls that allow users to input data.
type attribute.
type attribute specifies the type of <input> element to display.
The default type is text.
Other values are:
<form>
element, but may also appear outside of a <form> element declaration.
onchange event occurs when the value of an element has been changed.
<link> tag defines a link between a document and an external resource.
<link href="global.css" rel="stylesheet" type="text/css">
rel attribute is required. It specifies the relationship between the current document and the linked document
<link> tag is used to link to external CSS style sheets.
<link href="global.css" rel="stylesheet" type="text/css">
CSS stands for Cascading Style Sheets and is a separate, but complementary, language to HTML. CSS is what we use to apply styles to the content on our web page.
[~/srcPLgrado/temperature(master)]$ cat global.css
th, td      { vertical-align: top; text-align: right; font-size:large; }     /* Don't center table cells  */
#converted  { color: red; font-weight: bold; font-size:large;          }     /* Calculated values in bold */
input       {
              text-align: right;       /* Align input to the right  */
              border: none;
              border-radius: 20px 20px 20px 20px;
              padding: 5px  5px;
              font-size:large;       }
body
{
 background-color:#b0c4de;  /* blue */
 font-size:large;
 font-family: "Lucida Sans Typewriter", "Lucida Console", Monaco, "Bitstream Vera Sans Mono", monospace;
}

h1 {
    font-weight: normal;
    font-family: "Brush Script MT", cursive;
    background: #3C5681;
    padding: 5px 15px;
    color: white;
    display:inline-block;
    border-radius: 10px 10px 10px 10px;
}
th, td { vertical-align: top; text-align: right; font-size:large; } /* Don't center table cells */
What you see above is referred to as a rule set.
Here we're using commas to separate our selectors th and td.
This is a useful method to use to combine multiple selectors in a single rule set.
In this case, the styles will apply to all <th> and <td> elements,
nav would match all HTML <nav> elements, and a selector of ul would match all HTML unordered lists, or <ul> elements.
#)
preceding a string of characters.
The string of characters is defined by the developer.
This selector matches any HTML element that has an
ID attribute with the same value as that of the selector, but minus the hash symbol.
The rule:
#converted { color: red; font-weight: bold; font-size:large; } /* Calculated values in bold */
applies to:
<span class="output" id="converted">
Dado el selector
#container .box {
   float: left;
   padding-bottom: 15px;
}
¿A que elementos de este HTML se aplica?
<div id="container">
  <div class="box"></div>
  <div class="box-2"></div>
</div>

<div class="box"></div>
This declaration block will apply to all elements that have a class of box that are inside an element with an
ID of container. It's worth noting that the .box
element doesn't have to be an immediate
child: there could be another element wrapping .box,
and the styles would still apply.
Dada esta regla
#container > .box {
   float: left;
   padding-bottom: 15px;
}
In this example, the selector will match all elements that have a class of
box and that are immediate children of the
#container element.
That means, unlike the descendant combinator, there can't be
another element wrapping .box:
it has to be a direct child element.
¿A que elementos de este HTML se aplica?
<div id="container">
  <div class="box"></div>
  <div>
    <div class="box"></div>
  </div>
</div>
In this example, the CSS from the previous code example will apply only to the first
<div> element that has a class of box.
As you can see, the second <div>
element with a class of box is inside
another <div> element.
As a result, the styles will not apply to that element, even though it too has a class of
box.
Dada esta regla
h2 ~ p { margin-bottom: 20px; }
This type of selector is declared using the tilde character (~).
In this example, all paragraph elements (<p>)
will be styled with the specified rules, but only if they are siblings of
<h2> elements.
There could be other elements in between the <h2> and
<p>, and the styles would still apply.
¿A que elementos de este HTML se aplica?
<h2>Title</h2>
<p>Paragraph example 1.</p>
<p>Paragraph example 2.</p>
<p>Paragraph example 3.</p>
<div class="box">
  <p>Paragraph example 4.</p>
</div>
+),
and is almost the same as the general sibling selector.
The difference is that the targeted element must be an immediate sibling, not just a general sibling.
Dada esta regla
p+ p {
text-indent: 1.5em; margin-bottom: 0;
}
This example will apply the specified styles
only to paragraph elements that immediately follow other paragraph elements.
the first paragraph element on a page would not receive these styles.
Also, if another element appeared between two paragraphs, the second paragraph of the two wouldn't have the styles applied.
¿A que elementos de este HTML se aplica?
<h2>Title</h2>
<p>Paragraph example 1.</p>
<p>Paragraph example 2.</p>
<p>Paragraph example 3.</p>
<div class="box">
  <p>Paragraph example 4.</p>
  <p>Paragraph example 5.</p>
</div>
There should not be a space before the opening square bracket unless you intend to use it along with a descendant combinator.
Dada esta regla:
input[type="text"] {
   background-color: #444;
   width: 200px;
}
The attribute selector targets elements based on the presence and/or value of HTML attributes, and is declared using square brackets.
¿A que elementos de este HTML se aplica?
  <input type="text">
  <input type="submit">
Dada esta regla:
a:hover {
   color: red;
}
¿Que porción del selector es conocido como pseudo-clase?
¿Cuando se aplica la regla a un ancla <a>?
In this case, the pseudo-class portion of the selector is the :hover part.
Here we've attached this pseudo-class to all anchor elements
(<a> elements).
This means that when the user hovers their mouse
over an <a> element, the color property for that element will change to red.
This type of pseudo-class is a dynamic pseudo-class, because it occurs only in response to user interaction—in this case, the mouse moving over the targeted element.
It's important to recognize that these types of selectors do not just select elements; they select elements that are in a particular state.
Exprese con palabras a que elementos del documento se aplicará la siguiente regla:
#form [type=text] { border: solid 1px #ccc; }
This selector combines the ID selector with the attribute selector.
This will target all elements with a type attribute of text that are inside an element with an ID of
form.
p { font-size: 20px; }
p { font-size: 30px; }
¿Cual será el tamaño de font que se aplique a los elementos párrafo?
Selectors targeting styles later in a CSS document have precedence over the same selectors that appear earlier in the CSS file.
div p { color: blue; }
p{ color: red; }
¿Cual será el color que se aplique a los elementos párrafo?
In this instance, the color value for paragraph elements inside of <div>
elements will be blue, despite the fact that the second color declaration
appears later in the document.
So although the browser
does give some importance to the order of these rule sets, that order
is superseded by the specificity of the first rule set.
#main {
   color: green;
}
body div.container {
   color: pink;
}
¿Cual será el color que se aplique a este elemento <div>?
<div id="main" class="container"></div>
The ID selector has very high specificity and thus takes precedence over the second rule set.
For example, if you use an un-ordered list (the <ul> element) the browser will display the list with some existing
formatting styles, including bullets next to the individual list items (the <li> elements inside the <ul>).
By using a CSS reset document at the top of your CSS file, you can reset all these styles to a bare minimum.
Two of the most popular CSS resets are Eric Meyer's Reset and Nicolas Gallagher's Normalize.css
    <title>JavaScript Temperature Converter</title>
    <link href=normalize.css" rel="stylesheet" type="text/css">
    <link href="global.css" rel="stylesheet" type="text/css">
The box model refers to the usually invisible rectangular area that is created for each HTML element. This area has four basic components
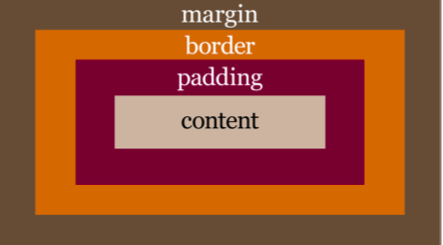
The content portion of the box model holds the actual content.
The content can be text, images, or whatever else is visible on a web page.
The padding of an element is defined using the padding property. The padding is the space around the content.
It can be defined for an individual side
(for example, padding-left: 20px) or
for all four sides in one declaration
padding: 20px 10px 30px 20px, for instance.
When declaring all four sides, you’re using a shorthand property.
Often when a CSS property takes multiple values like this,
they start at the top and go clockwise in relation to the element.
So, in the example just cited, this would apply 20px of padding to the
top, 10px to the right, 30px to the bottom, and 20px to the left.
The border of an element is defined using the border property.
This is a
shorthand property that defines the element's border-width, border-style, and border-color. For example,
border: 4px dashed orange.
Margins are similar to padding, and are defined using similar syntax
margin-left: 15pxor
margin: 10px 20px 10px 20pxThe margin portion of an element exists outside the element.
A margin creates space between the targeted element and surrounding elements.
.example {
  border-style: dashed;
  border-width: 2px;
  border-color: blue;
}
.example {
  border: solid;
  color: green;
}
¿De que color queda el borde de los elementos de clase example?
¿Que border-style tendrán?
¿Que border-width tendrán?
Here we’ve used the same selector on two different rule sets.
The second rule set will take precedence over the first, overriding any styles that are the same in both rule sets.
In the first rule set, we’ve defined all three border-related properties in longhand, setting the values to display a dashed border that’s 2px wide and colored blue.
But what’s the result of these two rule sets? Well, the border will become 3px wide (the default border width for a visible border,) and it'll be colored green, not blue.
This happens because the second rule set uses shorthand to
define the border-style as solid, but doesn’t define the other two properties (border-width and
border-color).
See
.example {
  margin: 10px 20px;
}
¿De que tamaño quedarán margin-top margin-right, margin-bottom y margin-left para los elementos de clase example?
Another thing to understand about shorthand is that for certain shorthand properties, the missing values are inherited based on the existing values.
We’re omitting the bottom and left, so they'll inherit from the top and right values.
Depurar estilos puede ser complicado. Lea el artículo Tips for Debugging HTML and CSS.
While you can not "debug" CSS, because it is not a scripting language, you can utilize the Chrome DevTools Elements panel to inspect an element and view the Styles pane on the right.
This will give you insights as to the styles being overridden or ignored (line threw).
The Styles pane is also useful because of it's ability to LiveEdit the document being inspected, which may help you iron out the issues.
If the styles are being overridden, you can then view the Computed Style pane to see the CSS that is actually being utilized to style your document.
HTML elements fall under two categories: block or inline.
<div>, <p>, h1, li
and <section>.
A block-level element is more of a structural, layout related element.
A block element is an element that takes up the full width available, and has a line break before and after it.
Inline elements include <span>, <b>, and <em>.
It's worth noting that inline elements are subject to CSS properties that affect text.
For example, line-height and letter-spacing are CSS properties that can be used to style inline elements.
However, those same properties wouldn't affect block elements.
The font-family property can hold several font names as a "fallback" system. If the browser does not support the first font, it tries the next font.
"use strict"; // Use ECMAScript 5 strict mode in browsers that support it
function calculate() {
  var result;
  var original       = document.getElementById("........");
  var temp = original.value;
  var regexp = /.............................../;

  var m = temp.match(......);

  if (m) {
    var num = ....;
    var type = ....;
    num = parseFloat(num);
    if (type == 'c' || type == 'C') {
      result = (num * 9/5)+32;
      result = ..............................
    }
    else {
      result = (num - 32)*5/9;
      result = ............................
    }
    converted.innerHTML = result;
  }
  else {
    converted.innerHTML = "ERROR! Try something like '-4.2C' instead";
  }
}
Para saber todo sobre
ipackage.json
visite este manual de npm o bien escriba npm help json en la línea de comandos.
The command:
npm init [-f|--force|-y|--yes]
Will ask you a bunch of questions, and then write a package.json for you.
If you already have a package.json file, it'll read that first, and default to the options in there.
It is strictly additive, so it does not delete options from your package.json
without a really good reason to do so.
If you invoke it with -f, --force, it will use only defaults and not prompt you for any options.
[/tmp/pl-grado-temperature-converter(karma)]$ npm init
This utility will walk you through creating a package.json file.
It only covers the most common items, and tries to guess sane defaults.

See `npm help json` for definitive documentation on these fields
and exactly what they do.

Use `npm install <pkg> --save` afterwards to install a package and
save it as a dependency in the package.json file.

Press ^C at any time to quit.
name: (pl-grado-temperature-converter)
version: (0.0.0) 0.0.1
description: ULL ESIT Grado de Informática. 3º. PL. Lab "Temperature Converter"
entry point: (temperature.js)
test command: open tests/index.html
git repository: (ssh://git@bitbucket.org/casiano/pl-grado-temperature-converter.git)
keywords: regexp
author: Casiano
license: (ISC)
About to write to /private/tmp/pl-grado-temperature-converter/package.json:

{
  "name": "pl-grado-temperature-converter",
  "version": "0.0.1",
  "description": "ULL ESIT Grado de Informática. 3º. PL. Lab \"Temperature Converter\"",
  "main": "temperature.js",
  "directories": {
    "test": "tests"
  },
  "scripts": {
    "test": "open tests/index.html"
  },
  "repository": {
    "type": "git",
    "url": "ssh://git@bitbucket.org/casiano/pl-grado-temperature-converter.git"
  },
  "keywords": [
    "regexp"
  ],
  "author": "Casiano",
  "license": "ISC"
}


Is this ok? (yes) y
Esto genera el fichero package.json:
[/tmp/pl-grado-temperature-converter(karma)]$ ls -ltr | tail -1
-rw-r--r--  1 casiano  wheel   487  5 feb 18:22 package.json
Si ahora escribo:
[/tmp/pl-grado-temperature-converter(karma)]$ npm test

> pl-grado-temperature-converter@0.0.1 test /private/tmp/pl-grado-temperature-converter
> open tests/index.html
Ejecutamos las pruebas en el navegador (en Mac OS X) supuesto que ya estuvieran escritas.
Mocha is the simple, flexible, and fun JavaScript unit-testing framework that runs in Node.js or in the browser.
It is open source (MIT licensed), and we can learn more about it at https://github.com/mochajs/mocha
Let's say Mocha setups and describes test suites and Chai provides convenient helpers to perform all kinds of assertions against your JavaScript code.
Podemos instalar mocha globalmente:
$ npm install -g mochapero podemos también añadirlo en
package.json como una devDependencies:
[/tmp/pl-grado-temperature-converter(karma)]$ head -n 5 package.json
{
  "dependencies": {},
  "devDependencies": {
    "mocha": "latest"
  },
Y ahora podemos instalar todas las dependencias usando npm install:
$ npm install
npm http GET https://registry.npmjs.org/mocha
npm http 200 https://registry.npmjs.org/mocha
npm http GET https://registry.npmjs.org/commander/2.3.0
...
En este caso mocha es instalado localmente, no globalmente:
[/tmp/pl-grado-temperature-converter(karma)]$ ls -ltr node_modules/
total 0
drwxr-xr-x  12 casiano  staff  408  5 feb 18:40 mocha
Una vez instalado Mocha, creamos la estructura para las pruebas:
$ mocha init testsesto en el caso de que lo hayamos instalado globalmente o bien
$ node_modules/mocha/bin/mocha init testssi lo hemos instalado localmente.
$ tree tests
tests
|-- index.html
|-- mocha.css
|-- mocha.js
`-- tests.js
Añadimos chai.js
(Véase
http://chaijs.com/guide/installation/) al directorio tests.
Chai is a platform-agnostic BDD/TDD assertion library featuring several interfaces (for example, should, expect, and assert). It is open source (MIT licensed), and we can learn more about it at http://chaijs.com/
We can also install Chai on the command line using npm, as follows:
npm install chai --save-dev
The latest tagged version will be available for hot-linking at http://chaijs.com/chai.js.
If you prefer to host yourself, use the chai.js file from the root of the
github project at https://github.com/chaijs/chai.
[/tmp/pl-grado-temperature-converter(karma)]$
$ curl https://raw.githubusercontent.com/chaijs/chai/master/chai.js -o tests/chai.js
  % Total    % Received % Xferd  Average Speed   Time    Time     Time  Current
                                 Dload  Upload   Total   Spent    Left  Speed
100  118k  100  118k    0     0  65521      0  0:00:01  0:00:01 --:--:-- 65500
Ya tenemos nuestro fichero tests/chai.js:
[/tmp/pl-grado-temperature-converter(karma)]$ head tests/chai.js

;(function(){

/**
 * Require the module at `name`.
 *
 * @param {String} name
 * @return {Object} exports
 * @api public
 */
Quedando el árbol como sigue:
[~/srcPLgrado/temperature(master)]$ tree tests/
tests/
|-- chai.js
|-- index.html
|-- mocha.css
|-- mocha.js
`-- tests.js

0 directories, 5 files
Modificamos el fichero tests/index.html que fué generado por mocha init
para
chai.js
temperature.js
mocha.setup('tdd'):
index.html con los correspondientes input y
span:
    <input id="original" placeholder="32F" size="50">
    <span class="output" id="converted"></span>
[~/srcPLgrado/temperature(master)]$ cat tests/index.html
<!DOCTYPE html>
<html>
  <head>
    <title>Mocha</title>
    <meta http-equiv="Content-Type" content="text/html; charset=UTF-8">
    <meta name="viewport" content="width=device-width, initial-scale=1.0">
    <link rel="stylesheet" href="mocha.css" />
  </head>
  <body>
    <div id="mocha"></div>
    <input id="original" placeholder="32F" size="50">
    <span class="output" id="converted"></span>

    <script src="chai.js"></script>
    <script src="mocha.js"></script>
    <script src="../temperature.js"></script>
    <script>mocha.setup('tdd')</script>
    <script src="tests.js"></script>

    <script>
      mocha.run();
    </script>
  </body>
</html>
The "TDD" interface provides
suite()
test()
setup()
teardown().
[~/srcPLgrado/temperature(master)]$ cat tests/tests.js
var assert = chai.assert;

suite('temperature', function() {
    test('32F = 0C', function() {
        original.value = "32F";
        calculate();
        assert.deepEqual(converted.innerHTML, "0.0 Celsius");
    });
    test('45C = 113.0 Farenheit', function() {
        original.value = "45C";
        calculate();
        assert.deepEqual(converted.innerHTML, "113.0 Farenheit");
    });
    test('5X = error', function() {
        original.value = "5X";
        calculate();
        assert.match(converted.innerHTML, /ERROR/);
    });
});
The BDD interface provides describe(), it(), before(), after(), beforeEach(), and afterEach():
describe('Array', function(){
  before(function(){
    // ...
  });

  describe('#indexOf()', function(){
    it('should return -1 when not present', function(){
      [1,2,3].indexOf(4).should.equal(-1);
    });
  });
});
The Chai should style allows for the same chainable assertions as the
expect interface, however it extends each object with a should
property to start your chain.
The assert style is exposed through assert interface.
This provides the classic assert-dot notation, similiar to that packaged with node.js.
This assert module, however, provides several additional tests and is browser compatible.
var assert = require('chai').assert
  , foo = 'bar'
  , beverages = { tea: [ 'chai', 'matcha', 'oolong' ] };

assert.typeOf(foo, 'string', 'foo is a string');
assert.equal(foo, 'bar', 'foo equal `bar`');
assert.lengthOf(foo, 3, 'foo`s value has a length of 3');
assert.lengthOf(beverages.tea, 3, 'beverages has 3 types of tea');
In all cases, the assert style allows you to include an optional message as the last parameter in the assert statement.
These will be included in the error messages should your assertion not pass.
The BDD style is exposed through expect or should interfaces. In both scenarios, you chain together natural language assertions.
var expect = require('chai').expect
  , foo = 'bar'
  , beverages = { tea: [ 'chai', 'matcha', 'oolong' ] };

expect(foo).to.be.a('string');
expect(foo).to.equal('bar');
expect(foo).to.have.length(3);
expect(beverages).to.have.property('tea').with.length(3);
Expect also allows you to include arbitrary messages to prepend to any failed assertions that might occur.
var answer = 43;
// AssertionError: expected 43 to equal 42.
expect(answer).to.equal(42);
// AssertionError: topic [answer]: expected 43 to equal 42.
expect(answer, 'topic [answer]').to.equal(42);
This comes in handy when being used with non-descript topics such as booleans or numbers.
tests/index.html:
$ open tests/index.html
Esta información aparece también en las secciones Unit Testing: Mocha 11.4.1 de estos apuntes.
Why would you want to use a task runner?
They’re small applications that automate often time consuming and boring tasks.
If you ever need to do any of the following then a task runner is for you:
We are going to use gulp as our task manager. To install it you can:
$ npm install --global gulp
devDependencies:
$ npm install --save-dev gulpThis will install
gulp in ./node_modules and
it will add a line to package.json as the following:
  "devDependencies": {
    "mocha": "latest",
    "gulp": "~3.8.10"
  },
Now we can write our gulpfile:
[/tmp/pl-grado-temperature-converter(karma)]$ cat gulpfile.js
var gulp    = require('gulp'),
    gutil   = require('gulp-util'),
    uglify  = require('gulp-uglify'),
    concat  = require('gulp-concat');
var del     = require('del');
var minifyHTML = require('gulp-minify-html');
var minifyCSS  = require('gulp-minify-css');

gulp.task('minify', function () {
  gulp.src('temperature.js')
  .pipe(uglify())
  .pipe(gulp.dest('minified'));

  gulp.src('./index.html')
    .pipe(minifyHTML())
    .pipe(gulp.dest('./minified/'))

  gulp.src('./*.css')
   .pipe(minifyCSS({keepBreaks:true}))
   .pipe(gulp.dest('./minified/'))
});

gulp.task('clean', function(cb) {
  del(['minified/*'], cb);
});
gulp.task(name, fn) – registers a function with a name
gulp.src(glob) – returns a readable stream
pipe() method takes the source stream derived from the src()
method and passes it to the specific plugin being referenced.
gulp.dest(folder) – returns a writable stream
gulp.watch(glob, fn) – runs a function when a file that matches the glob changes
Gulp on its own doesn’t do a lot. We need to install plugins and add tasks to the gulpfile to put Gulp into action. To concatenate files we’ll need the gulp-concat plugin; to install it run this from the command line:-
npm install gulp-concat --save-devthe four Gulp methods that we will be using:- Again, if you check your
package.json
file you should see a new line referencing the newly installed plugin:-
"gulp-concat": "~2.1.7"
Después de instalar todas las dependencias:
$ npm i gulp-util --save-dev
$ npm i gulp-...  --save-dev
podemos ejecutar las tareas:
$ gulp minify
[22:07:58] Using gulpfile ~/local/src/javascript/PLgrado/temperature/gulpfile.js
[22:07:58] Starting 'minify'...
Que produce el directorio
minified:
$ ls -l minified/
total 32
-rw-r--r--  1 casiano  staff   510  5 feb 21:56 global.css
-rw-r--r--  1 casiano  staff   594  5 feb 21:56 index.html
-rw-r--r--  1 casiano  staff  2021  5 feb 21:56 normalize.css
-rw-r--r--  1 casiano  staff   334  5 feb 21:56 temperature.js
que como vemos ha compactado los ficheros:
$ ls -l temperature.js normalize.css index.html global.css
-rw-r--r--  1 casiano  staff   934  4 feb 09:11 global.css
-rw-r--r--  1 casiano  staff   749  3 feb 10:40 index.html
-rw-r--r--  1 casiano  staff  7798 30 ene 22:00 normalize.css
-rw-r--r--  1 casiano  staff   638  3 feb 15:21 temperature.js
Podemos ver la lista de tareas mediante la opción
-T:
$ gulp -T
[22:00:40] Using gulpfile ~/local/src/javascript/PLgrado/temperature/gulpfile.js
[22:00:40] Tasks for ~/local/src/javascript/PLgrado/temperature/gulpfile.js
[22:00:40] |-- minify
[22:00:40] `-- clean
Podemos borrar las ficheros generados con
gulp clean:
$ gulp clean
[22:00:46] Using gulpfile ~/local/src/javascript/PLgrado/temperature/gulpfile.js
[22:00:46] Starting 'clean'...
[22:00:46] Finished 'clean' after 7.68 ms
$ ls -l minified/
$
gulp has very few flags to know about. All other flags are for tasks to use if needed.
-v or --version will display the global and local gulp versions
--require <module path> will require a module before running the gulpfile. This is useful for transpilers but also has other applications. You can use multiple --require flags
--gulpfile <gulpfile path> will manually set path of gulpfile. Useful if you have multiple gulpfiles. This will set the CWD to the gulpfile directory as well
--cwd <dir path> will manually set the CWD. The search for the gulpfile, as well as the relativity of all requires will be from here
-T or --tasks will display the task dependency tree for the loaded gulpfile
--tasks-simple will display a plaintext list of tasks for the loaded gulpfile
--color will force gulp and gulp plugins to display colors even when no color support is detected
--no-color will force gulp and gulp plugins to not display colors even when color support is detected
--silent will disable all gulp logging
Tasks can be executed by running gulp <task> <othertask>.
Just running gulp will execute the task you registered called default.
If there is no default task gulp will error.
See
CLI.md
at gulpjs/gulp.