![]()
Annotated Reading of the Essentials Section of the Vue.js Guide
These are my notes written in pandoc markdown (Casiano 2021a) from reading the guide of Vue.js (v2) (Vue 2021), the book (Djirdeh, Murray, and Lerner 2018), (Vuejs 2021), (VueSchool 2018), (VueSchool 2019) and other references.
A draft of the incomplete notes for the reading of the Vue Guide v3 is in the reference (Casiano 2021b).
This document only covers the initial sections of the Essentials part of the Guide, from section Introduction up to section Computed Properties and Watchers.
These notes have been ellaborated using pandoc to translate it the markdown to HTML.
At the current time (December 2021), this notes are experimental, since the HTML generated by pandoc has some incompatibilities with Vue and I had to resort to some awful tricks to made them work.
- I’m using the pandoc-include filter
- The citation styles have been taken from (Org 2021).
- The HTML generation is reached using (Mushiyo 2017), a Pandoc HTML template that has a navbar on the top of the page for website navigation, and a TOC (table of contents) on the sidebar for page navigation. The
../mathjaxfile and the option--include-in-header=../mathjaxhave been added in this version to include mathjax so we can include formulas like \(x^2_3 = \sqrt{x^2+1}\)
To see the result, you can
- Open the deployment in the GitHub pages https://crguezl.github.io/learning-vue-geting-started-guide/ of the repo crguezl/learning-vue-geting-started-guide containing the notes or
- To install it locally, fork the repo. You have to have
pandocinstalled and then- Run
npm install-pandoc-dependenciesto installpandoc-include - Run
npm startto compile the sources and open the resultingindex.htmlfile.
- Run
Introduction to Vue.js
Vue (pronounced /vjuː/, like view) is a progressive framework for building user interfaces.
Unlike other monolithic frameworks, Vue is designed from the ground up to be incrementally adoptable.
The core library is focused on the view layer only, and is easy to pick up and integrate with other libraries or existing projects.
On the other hand, Vue is also perfectly capable of powering sophisticated Single-Page Applications when used in combination with modern tooling and supporting libraries.
Simple example
At the core of Vue.js is a system that enables us to declaratively render data to the DOM using straightforward template syntax:
<!-- development version, includes helpful console warnings -->
<script src="https://cdn.jsdelivr.net/npm/vue@2/dist/vue.js"></script>


<h2>
  <div id="app">
    {{ message }}
  </div>
</h2>

<script>
  var app = new Vue({
    el: '#app',
    data: {
      message: 'Hello Vue!'
    }
  })
</script>
Execution:
{{ message }}
{{ message }}We have already created our very first Vue app!
This looks pretty similar to rendering a string template, but Vue has done a lot of work under the hood. The data and the DOM are now linked, and everything is now reactive!.
Check in the developer’s tools
How do we know?
- Open your browser’s JavaScript console (right now, on the GH page) and
-
set
app.messageto a different value.
Exercise: Install Google Chrome extension for Vue
Install Google Chrome extension for Vue
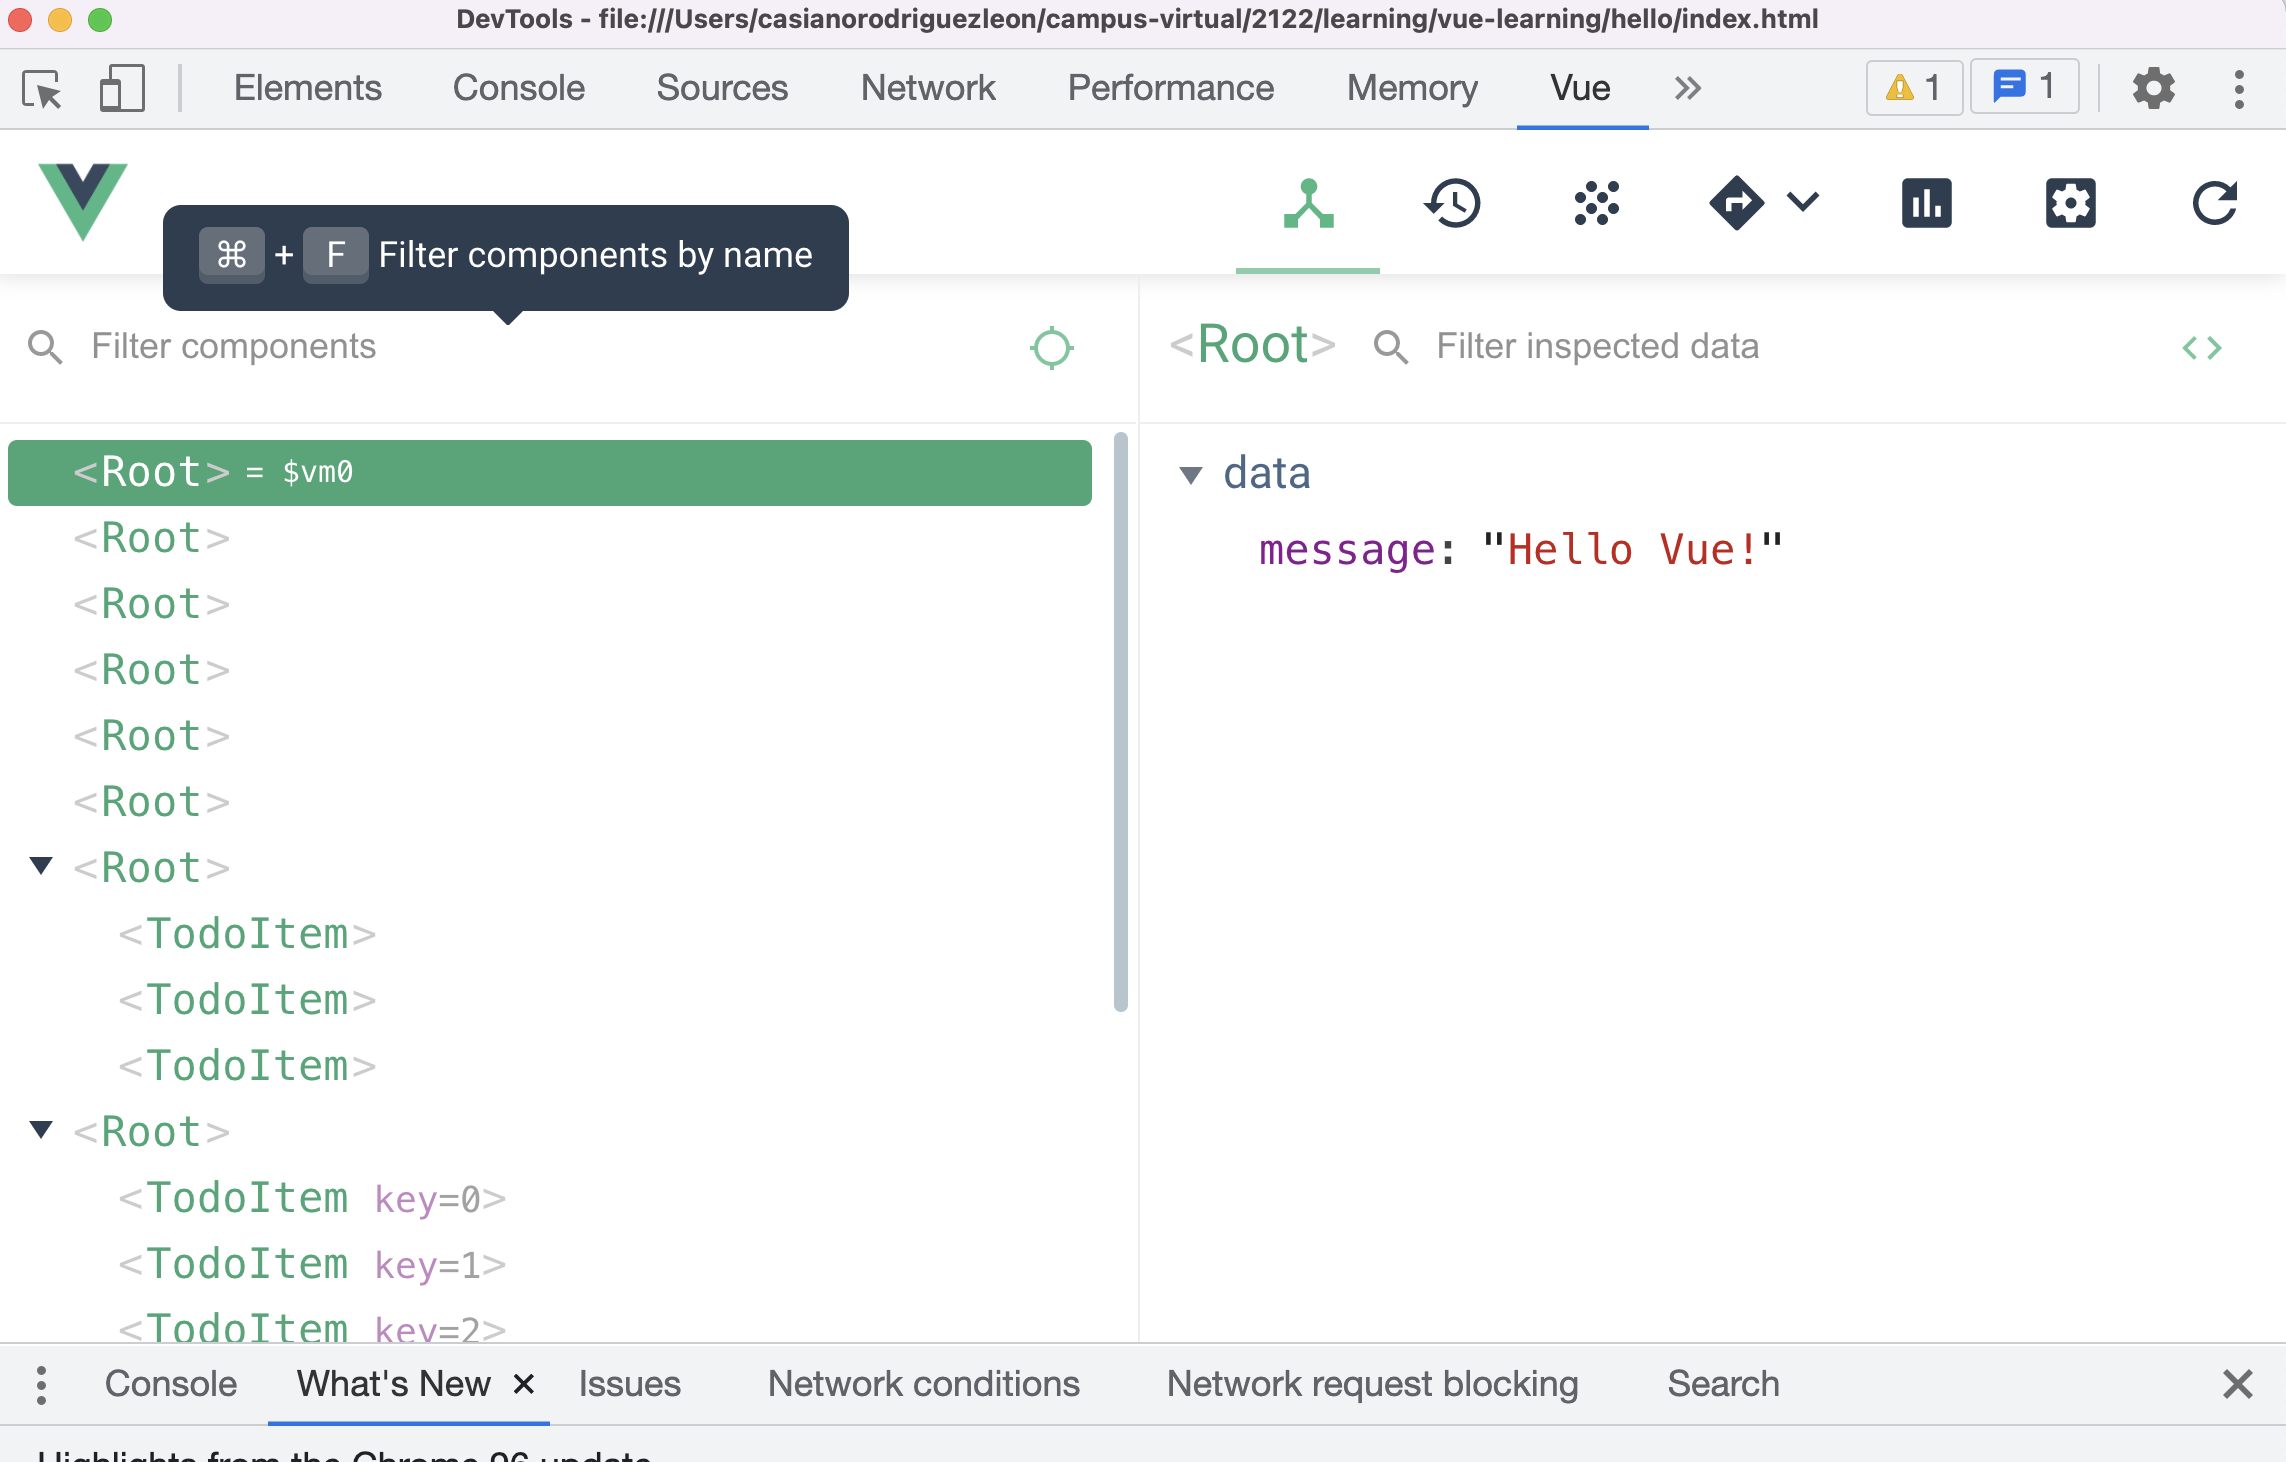
Remember to config the extension to allow file:// access
No interpolation occurs outside the Vue app entry point
This message appears verbatim:
<h3>{{ message }}</h3>because it is outside the element to wich Vue has been anchored.
Execution:
{{ message }}
The v-bind directive
Here we define a second entry point for a second Vue app object:
<div id="app-2">
  <span v-bind:title="message">
    <strong>
      Hover your mouse over me for a few seconds
      to see my dynamically bound title!
    </strong>
  </span>
</div>

<script>
  var app2 = new Vue({
    el: '#app-2',
    data: {
      message: 'You loaded this page on ' + new Date().toLocaleString()
    }
  })
</script>
Execution:
Hover your mouse over me for a few seconds to see my dynamically bound title!
Here we are encountering something new.
- The
v-bindattribute you are seeing is called a directive. - Directives are prefixed with
v-to indicate that they are special attributes provided by Vue, and as you may have guessed, they apply special reactive behavior to the rendered DOM. - Here, it is basically saying keep this element’s
titleattribute up-to-date with themessageproperty on the Vue instance.
If you open up your JavaScript console again and enter
app2.message = ‘some new message’,
you’ll once again see that the bound HTML - in this case the title attribute - has been updated.
The v-bind:attribute="expression" directive is used to bind a expression to an HTML attribute.
Conditionals
It’s easy to toggle the presence of an element, too:
<div id="app-3">
  <span v-if="seen">Now you see me</span>
</div>

<script>
var app3 = new Vue({
  el: '#app-3',
  data: {
    seen: true
  }
})
</script>
About this notes: This example initially didn’t work due to pandoc modifying the directive v-if inside the source to v-if. I had to remove the data- prefix to make it work. See script remove-datain src/package.json. The same happens with some other directives.
Execution:
Now you see me
Loops: v-for
There are quite a few other directives, each with its own special functionality.
For example, the v-for directive can be used for displaying a list of items using the data from an Array:
<div id="app-4">
  <ol>
    <li v-for="todo in todos">
      {{ todo.text }}
    </li>
  </ol>
</div>

<script>
var app4 = new Vue({
  el: '#app-4',
  data: {
    todos: [
      { text: 'Learn JavaScript' },
      { text: 'Learn Vue' },
      { text: 'Build something awesome' }
    ]
  }
})
</script>- {{ todo.text }}
The v-for directive can be used also with objects.
<div id="appVforWithObjects" class="execution">
  <ul>
    <li v-for="(rent, city, index) in averageRent">
    {{ index }}: The average rent in {{ city }} is {{ rent }} €
    </li>
  </ul>
</div>

<script>
  let appVforWithObjects = new Vue({
    el: "#appVforWithObjects",
    data() {
      return {
        averageRent: {
        "Las Palmas": 747,
        "Santa Cruz de Tenerife": 787,
        "La Laguna": 691
      }
      }
    }
  })
</script>
Note that the order of arguments is (value, key, index). The value goes first.
- {{ index }}: The average rent in {{ city }} is {{ rent }} €
Handling User Input
<div id="app-5">
  <p>{{ message }}</p>
  <button v-on:click="reverseMessage">Reverse Message</button>
</div>

<script>
var app5 = new Vue({
  el: '#app-5',
  data: {
    message: 'Hello Vue.js!'
  },
  methods: {
    reverseMessage: function () {
      this.message = this.message.split('').reverse().join('')
    }
  }
})
</script>
{{ message }}
v-model
Vue also provides the v-model directive that makes two-way binding between form input and app state a breeze:
<div id="app-6">
  <p>{{ message }}</p>
  <input v-model="message">
</div>

<script>
var app6 = new Vue({
  el: '#app-6',
  data: {
    message: 'Hello Vue!'
  }
})
</script>
Execution:
{{ message }}
The following example combines the v-model directive with the v-if, v-else-if and v-else directives:
<div id="appifvsshow" class="execution">
<strong>Select a dog:</strong>
<select v-model=selected><br/>
  <option value=0>First dog</option>
  <option value=1>Second dog</option>
  <option value=2>All the dogs</option>
</select>
<span>Selected option: {{ selected }}</span>
<p v-if="selected === '0'">First dog is {{ dogs[0] }}</p>
<p v-else-if="selected === '1'">Second dog is {{ dogs[1] }}</p>
<p v-else>All the dogs are {{ dogs }}</p>
</div>

<script>
let appifvsshow = new Vue({
  el: "#appifvsshow",
  data: {
    dogs: [ "terrier", "beagle", "chihuahua", "dalmatian" ],
    selected: null
  }
})
</script>First dog is {{ dogs[0] }}
Second dog is {{ dogs[1] }}
All the dogs are {{ dogs }}
Composing with Components
The component system is another important concept in Vue, because it’s an abstraction that allows us to build large-scale applications composed of small, self-contained, and often reusable components.
If we think about it, almost any type of application interface can be abstracted into a tree of components:

In Vue, a component is essentially a Vue instance with pre-defined options. Registering a component in Vue is straightforward:
// Define a new component called todo-item
Vue.component('todo-item', {
  template: '<li>This is a todo</li>'
})

var appXXX = new Vue({
  el: '#app-XXX',
  data: {
    groceryList: [
      { id: 0, text: 'Vegetables' },
      { id: 1, text: 'Cheese' },
      { id: 2, text: 'Whatever else humans are supposed to eat' }
    ]
  }
})
Now you can compose it in another component’s template:
<div id="app-XXX">
  <ol>
    <todo-item
      v-for="item in groceryList"
    ></todo-item>
  </ol>
</div>
But this would render the same text for every todo, which is not super interesting:
Execution:
We should be able to pass data from the parent scope into child components.
Let’s modify the component definition to make it accept a prop:
Vue.component('todo-item', {
  props: ['todo'],
  template: '<li>{{ todo.text }}</li>'
})
The todo-item component now accepts a “prop,” which is like a custom attribute. This prop is called todo.
Now we can pass the todo into each repeated component using v-bind:
<div id="app-7">
  <ol>
    <todo-item
      v-for="item in groceryList"
      v-bind:todo="item"
      v-bind:key="item.id"
    ></todo-item>
  </ol>
</div>
Now when using the todo-item we bind the todo property to the item in the groceryList array so that its content can be dynamic.
We also need to provide each component with a “key,” which will be explained later.
Vue.component('todo-item', {
  props: ['todo'],
  template: '<li>{{ todo.text }}</li>'
})

var app7 = new Vue({
  el: '#app-7',
  data: {
    groceryList: [
      { id: 0, text: 'Vegetables' },
      { id: 1, text: 'Cheese' },
      { id: 2, text: 'Whatever else humans are supposed to eat' }
    ]
  }
})
Execution:
Open the console and add to app7.groceryList a new item. See what happens.
See section Components Basics to know more about Vue Components.
In a large application, it is necessary to divide the whole app into components to make development manageable.
We will talk more about components later, but here’s an (imaginary) example of what an app’s template might look like with components:
<div id="app">
  <app-nav></app-nav>
  <app-view>
    <app-sidebar></app-sidebar>
    <app-content></app-content>
  </app-view>
</div>
The Vue Instance
Creating a Vue Instance
Every Vue application starts by creating a new Vue instance with the Vue function:
var vm = new Vue({
  // options
})
Although not strictly associated with the MVVM pattern, Vue’s design was partly inspired by it. As a convention, we often use the variable vm (short for ViewModel) to refer to our Vue instance. (Vue 2021)
When you create a Vue instance, you pass in an options object. See the API.
These are the main properties of the options object:
A Vue application consists of a root Vue instance created with new Vue, optionally organized into a tree of nested, reusable components.
For example, a todo app’s component tree might look like this:
Root Instance
└─ TodoList
   ├─ TodoItem
   │  ├─ TodoButtonDelete
   │  └─ TodoButtonEdit
   └─ TodoListFooter
      ├─ TodosButtonClear
      └─ TodoListStatistics
All Vue components are also Vue instances, and so accept the same options object (except for a few root-specific options).
Data and methods
When a Vue instance is created, it adds all the properties found in its data object to Vue’s reactivity system.
When the values of those properties change, the view will react, updating to match the new values.
// Our data object
var data = { a: 1 }

// The object is added to a Vue instance
var vm = new Vue({
  data: data
})

// Getting the property on the instance
// returns the one from the original data
vm.a == data.a // => true

// Setting the property on the instance
// also affects the original data
vm.a = 2
data.a // => 2

// ... and vice-versa
data.a = 3
vm.a // => 3
When this data changes, the view will re-render.
It should be noted that properties in data are only reactive if they existed when the instance was created. That means if you add a new property, like:
vm.b = 'hi'Then changes to b will not trigger any view updates.
If you know you’ll need a property later, but it starts out empty or non-existent, you’ll need to set some initial value. For example:
data: {
  newTodoText: '',
  visitCount: 0,
  hideCompletedTodos: false,
  todos: [],
  error: null
}
The only exception to this being the use of Object.freeze(), which prevents existing properties from being changed, which also means the reactivity system can’t track changes.
var obj = {
  foo: 'bar'
}

Object.freeze(obj)

new Vue({
  el: '#app',
  data: obj
})
<div id="app">
<p>{{ foo }}</p>
<!-- this will no longer update `foo`! -->
<button v-on:click="foo = 'baz'">Change it</button>
</div>In addition to data properties, Vue instances expose a number of useful instance properties and methods. These are prefixed with $ to differentiate them from user-defined properties.
For example:
var data = { a: 1 }
var vm = new Vue({
  el: '#example',
  data: data
})

vm.$data === data // => true
vm.$el === document.getElementById('example') // => true

// $watch is an instance method
vm.$watch('a', function (newValue, oldValue) {
  // This callback will be called when `vm.a` changes
})
See Instance Properties in the API Reference.
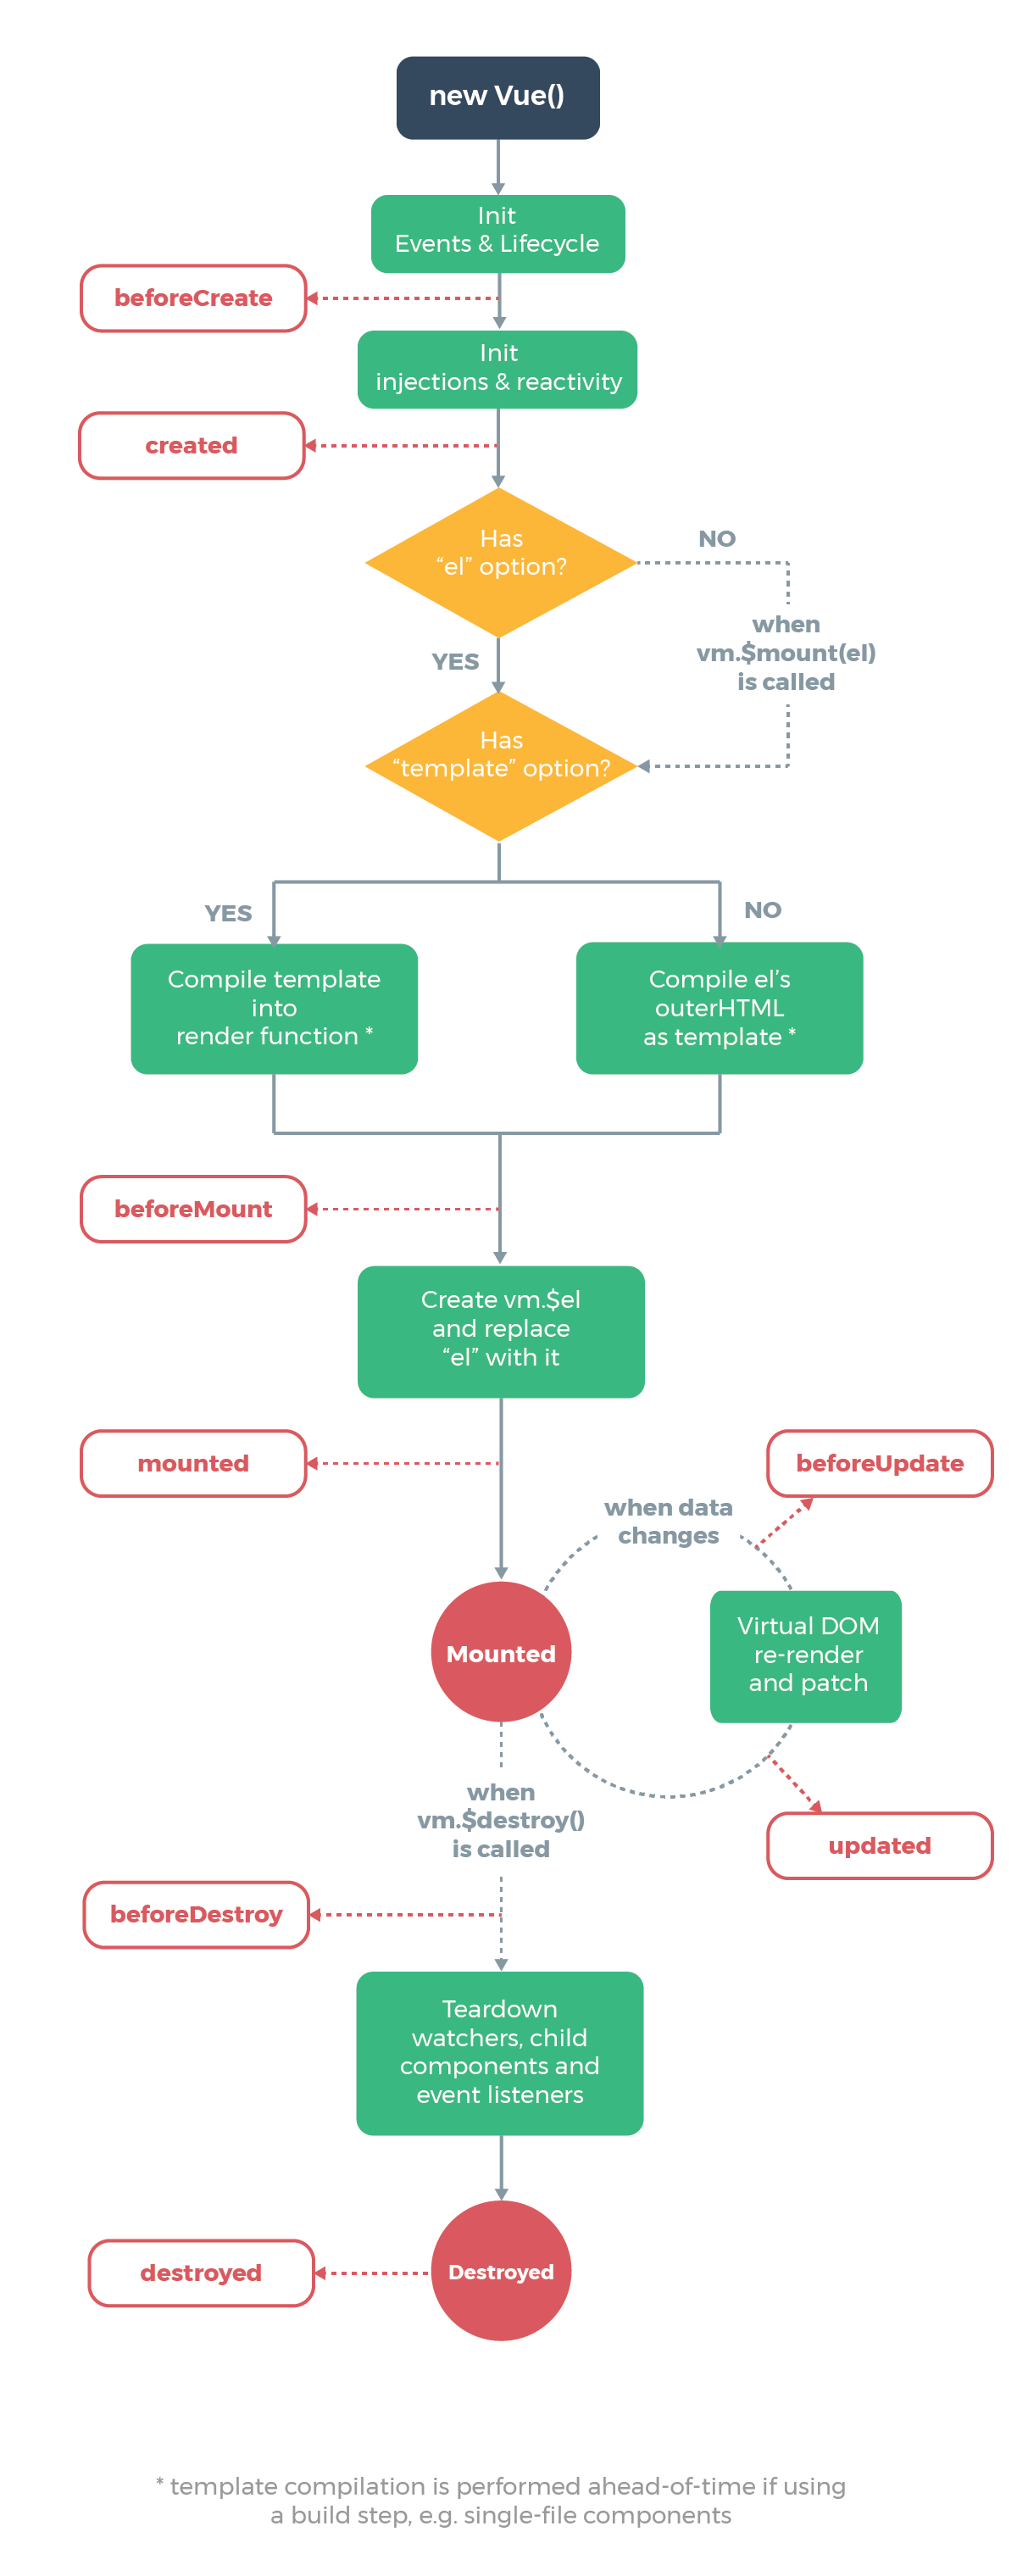
Instance Lifecycle Hooks
Each Vue instance goes through a series of initialization steps when it’s created - for example,
- it needs to set up data observation,
- compile the template,
- mount the instance to the DOM, and
- update the DOM when data changes.
Along the way, it also runs functions called lifecycle hooks, giving users the opportunity to add their own code at specific stages.
For example, the created hook can be used to run code after an instance is created:
new Vue({
  data: {
    a: 1
  },
  created: function () {
    // `this` points to the vm instance
    console.log('a is: ' + this.a)
  }
})
// => "a is: 1"
There are also other hooks which will be called at different stages of the instance’s lifecycle, such as mounted, updated, and destroyed.
All lifecycle hooks are called with their this context pointing to the Vue instance invoking it.
Lifecycle Diagram
Below is a diagram for the instance lifecycle. You don’t need to fully understand everything going on right now, but as you learn and build more, it will be a useful reference.
Reactivity
What makes Vue different from any templating language?
Vue watches the data object for changes and updates the DOM when the data changes.
<div id="app-reactivity-1" class="execution">
  <p> {{ seconds }} have elapsed since you opened the page </p>
</div>
<script>
new Vue({
  el: "#app-reactivity-1",
  data: {
    seconds: 0
  },
  created() {
    setInterval(() => {
      this.seconds++
    }, 1000);
  }
})
</script>
The lifecycle hook created runs when the app is initiated.
{{ seconds }} have elapsed since you opened the page
How it works
Vue’s reactivity works by modifying every object added to the data object so that Vue is notified when it changes. Every property in an object is replaced with a getter and a setter so that you can use the object as a normal object, but when you change the property, Vue knows that it has changed.
The idea is that if you have some variable userId:
const data = {
  userId: 10
};
you can do something like this to control when userId changes:
const storedData = {};

storedData.userId = data.userId;

Object.defineProperty(data, 'userId', {
  get() {
    return storedData.userId;
  },
  set(value) {
    console.log('userId changed!');
    storedData.userId = value;
  },
  configurable: true,
  enumerable: true
})
Every component instance has a corresponding watcher instance, which records any properties touched during the component’s render as dependencies.
Later on when a dependency’s setter is triggered, it notifies the watcher, which in turn causes the component to re-render.
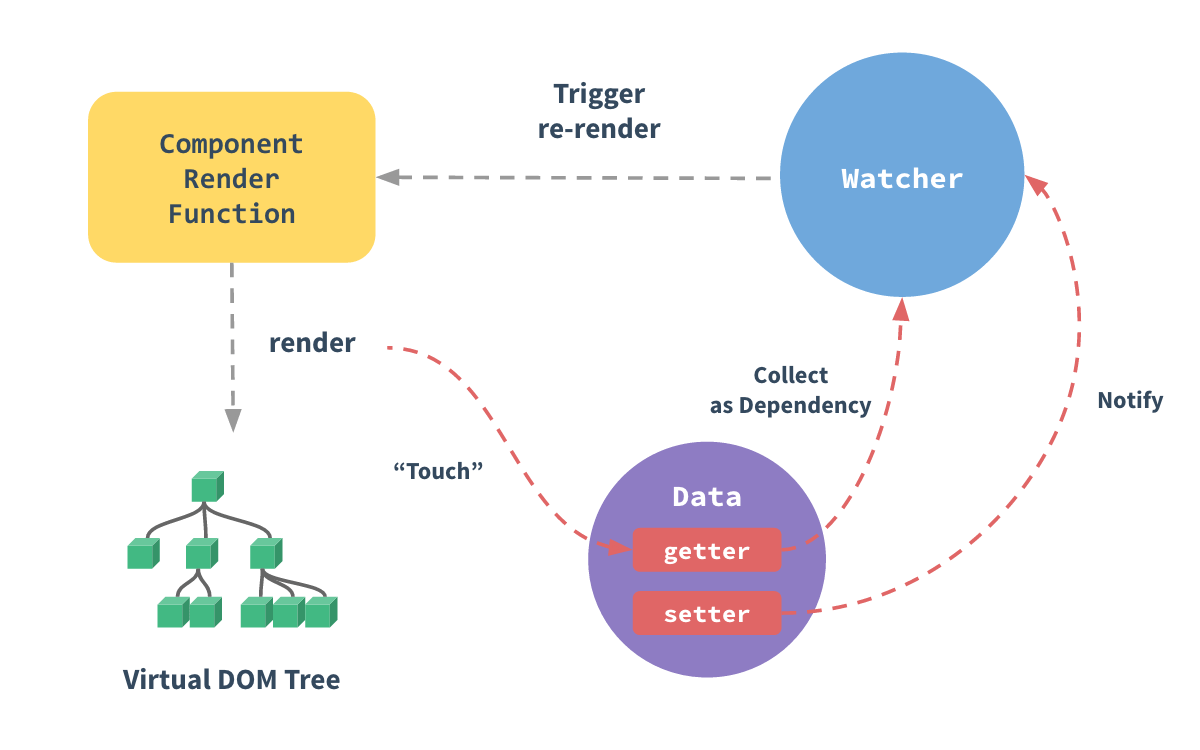
This isn’t exactly how Vue does it, but it is a way to think about it. See (Macrae 2018).
Caveats
There are some limitations on the way Vue’s reactivity works.
Ading new properties to an object
Because the getter/setter functions are added when the instance is initialized, only the properties defined at creation time are reactive; when you add later a new property, it won’t be reactive if you do it directly.
<div id="appNewProperty" class="execution">
<a v-bind:href="formData.surname || 'unknown'">{{ formData.name }}</a>
</div>

<script>
const appNewProperty = new Vue({
  el: "#appNewProperty",
  data: {
    formData: {
      name: "Alan"
    }
  }
});

appNewProperty.formData.surname = "Turing"

</script>
If you set the mouse above the link you will see it points to unknown and not to Turing
Vue provides the function Vue.set that you can use to set reactive properties:
<div id="appNewPropertySet" class="execution">
<a v-bind:href="`assets/images/${formData.surname || 'unknown'}.png`">{{ formData.name }}</a>
</div>

<script>
const appNewPropertySet = new Vue({
  el: "#appNewPropertySet",
  data: {
    formData: {
      name: "Alan",
    }
  }
});

Vue.set(appNewPropertySet.formData, "surname", "Turing");
</script>
If you set the mouse above the link you will see it points to assets/images/Turing.png
Setting items on an array
You can’t set items on an array by the index:
<div id="appSetItemOnArray" class="execution">
  <p>Computer Scientists: {{ cs }}</p>
  <p>cs[2] is {{ cs[2] }}</p>
</div>

<script>
const appSetItemOnArray = new Vue({
  el: "#appSetItemOnArray",
  data: {
    cs: ["Alan Turing", "John McCarty", "Denis Ritchie", "Ada Lovelace", "Grace Hopper"]
  }
});

appSetItemOnArray.cs[2] = "Alan Kay";
</script>
Computer Scientists: {{ cs }}
cs[2] is {{ cs[2] }}
However, you can use Vue.set to trigger the watchers:
<div id="appSetItemOnArray2" class="execution">
  <p>Computer Scientists: {{ cs }}</p>
  <p>cs[2] is {{ cs[2] }}</p>
</div>

<script>
const appSetItemOnArray2 = new Vue({
  el: "#appSetItemOnArray2",
  data: {
    cs: ["Alan Turing", "John McCarty", "Denis Ritchie", "Ada Lovelace", "Grace Hopper"]
  }
});

Vue.set(appSetItemOnArray2.cs, 2, "Alan Kay");
</script>
Computer Scientists: {{ cs }}
cs[2] is {{ cs[2] }}
Exercise: The instance lifecycle
A helpful resource to understand the instance lifecycle is the YouTube video (edutechional 2018). Watch the video and reproduce the steps. Leave the resulting code in the folder lifecycle of the assignment repo.
Template Syntax
Vue.js uses an HTML-based template syntax that allows you to declaratively bind the rendered DOM to the underlying Vue instance’s data.
All Vue.js templates are valid HTML that can be parsed by spec-compliant browsers and HTML parsers.
Under the hood, Vue compiles the templates into Virtual DOM1 render functions.
Combined with the reactivity system, Vue is able to intelligently figure out the minimal number of components to re-render and apply the minimal amount of DOM manipulations when the app state changes.
An Introduction to Render Functions
If you are familiar with Virtual DOM concepts and prefer the raw power of JavaScript, you can also directly write render functions instead of templates, with optional JSX support.
Here follows an example using a render function. Say you want to generate anchored headings:
<div id="app-XXX2" class="execution">
  <anchored-heading level="1">Section Hello</anchored-heading>
  Begining Blah blah ...
  <anchored-heading level="2">Subsection World</anchored-heading>
  Blah blah in subsection ...
    <anchored-heading level="1">Section Bye</anchored-heading>
  Blah blah final ...
</div>
In this case, we have to know a few things:
- That children of a component are stored on the component instance at
this.$slots.default, - That
renderhas to produce the VDOM element using its argumentcreateElement - How it works the createElement function passed to
render
- It is also convenient to know about the
v-slotdirective
<script>
Vue.component('anchored-heading', {
  render: function (createElement) {
    let default0 = this.$slots.default[0];
    let text = default0.text; // The text between the brackets
    console.log(default0);

    let name = text.replace(/\s+/g,'').replace(/\W+/g,'-');
    return createElement(
      'h' + this.level,
      [ createElement('a', // Building the child
                    { attrs:
                       {
                          name: name,
                          href: `#${name}`
                       }
                    },  text) ],
    )
  },
  props: [ "level" ]
})

var appXXX2 = new Vue({
  el: '#app-XXX2'
})
</script>
The example produces the following output:
Exercise: Introduction to Render Functions
See the video (Erik 2017). Reproduce the steps. Leave the result in the folder renderfunctions of the assignment repo.
Interpolations
Text
The most basic form of data binding is text interpolation using the Mustache syntax (double curly braces):
<span>Message: {{ msg }}</span>The mustache tag will be replaced with the value of the msg property on the corresponding data object. It will also be updated whenever the data object’s msg property changes.
You can also perform one-time interpolations that do not update on data change by using the v-once directive, but keep in mind this will also affect any other bindings on the same node:
<span v-once>This will never change: {{ msg }}</span>Check this example:
<h2 class="execution">
  <div id="appXXX4">
  <span>Message: {{ msg }}</span>
  <br/>
  <span v-once>This will never change: {{ msg }}</span>
  </div>
</h2>

<script>
  var appXXX4 = new Vue({
    el: '#appXXX4',
    data: {
      msg: 'Hello Vue!'
    }
  })
</script>
Open the dev tools, try to change appXXX4.msg and see what happens:
Message: {{ msg }}
This will never change: {{ msg }}
This will never change: {{ msg }}
Raw HTML. The v-html directive
Sometimes you might want to set the HTML of an element from a expression. Let’s say you’re calling an API that returns some HTML which you need to display on the page. Vue has automatic HTML escaping built in, so the double mustaches interprets the data as plain text, not HTML. In order to output real HTML, you will need to use the v-html directive:
<p>Using mustaches: {{ rawHtml }}</p>
<p>Using v-html directive: <span v-html="rawHtml"></span></p>
The contents of the span will be replaced with the value of the rawHtml property, interpreted as plain HTML - data bindings are ignored.
See this example:
<div class="execution">
  <div id="appXXX5">
   <p>Using mustaches: {{ rawHtml }}</p>
   <p>Using v-html directive: <span v-html="rawHtml"></span></p>
  </div>
</div>

<script>
  var appXXX5 = new Vue({
    el: '#appXXX5',
    data: {
      rawHtml: '<i>Hello</i> {{ text }} <b>Vue</b>!',
      text: "Chazam!"
    }
  })
</script>
Using mustaches: {{ rawHtml }}
Using v-html directive:
Note that you cannot use v-html to compose template partials, because Vue is not a string-based templating engine.
Instead, components are preferred as the fundamental unit for UI reuse and composition.
Dynamically rendering arbitrary HTML on your website can be very dangerous because it can easily lead to XSS vulnerabilities. Never put user input in v-html or allow users to modify anything that goes through v-html without carefully validating and escaping what they have written.
Only use HTML interpolation on trusted content and never on user-provided content.
Attributes
Mustaches cannot be used inside HTML attributes. Instead, use a v-bind directive:
<div v-bind:id="dynamicId"></div>In the case of boolean attributes, where their mere existence implies true, v-bind works a little differently.
In this example:
<button v-bind:disabled="isButtonDisabled">Button</button>If isButtonDisabled has the value of null, undefined, or false, the disabled attribute will not even be included in the rendered <button> element.
Using JavaScript Expressions
So far we’ve only been binding to simple property keys in our templates. But Vue.js actually supports the full power of JavaScript expressions inside all data bindings:
{{ number + 1 }}

{{ ok ? 'YES' : 'NO' }}

{{ message.split('').reverse().join('') }}

<div v-bind:id="'list-' + id"></div>
These expressions will be evaluated as JavaScript in the data scope of the owner Vue instance.
One restriction is that each binding can only contain one single expression, so the following will NOT work:
<!-- this is a statement, not an expression: -->
{{ var a = 1 }}

<!-- flow control won't work either, use ternary expressions -->
{{ if (ok) { return message } }}
Template expressions are sandboxed and only have access to a whitelist of globals such as Math and Date.
You should not attempt to access user-defined globals in template expressions.
Directives
Directives are special attributes with the v- prefix.
Directive attribute values are expected to be a single JavaScript expression (with the exception of v-for, which will be discussed later).
A directive’s job is to reactively apply side effects to the DOM when the value of its expression changes.
Let’s review the example we saw in the introduction:
<p v-if="seen">Now you see me</p>Here, the v-if directive would remove/insert the <p> element based on the truthiness of the value of the expression seen.
Arguments
Some directives can take an argument, denoted by a colon after the directive name.
For example, the v-bind directive is used to reactively update an HTML attribute:
<a v-bind:href="url"> ... </a>Here href is the argument, which tells the v-bind directive to bind the element’s href attribute to the value of the expression url.
Another example is the v-on directive, which listens to DOM events:
<a v-on:click="doSomething"> ... </a>Here the argument is the event name to listen to.
Dynamic Arguments
Starting in version 2.6.0, it is also possible to use a JavaScript expression in a directive argument by wrapping it with square brackets:
Note that there are some constraints to the argument expression, as explained in the “Dynamic Argument Expression Constraints” section below.
<a v-bind:[attributeName]="url"> ... </a>Here attributeName will be dynamically evaluated as a JavaScript expression, and its evaluated value will be used as the final value for the argument.
For example, if your Vue instance has a data property, attributeName, whose value is "href", then this binding will be equivalent to v-bind:href.
Similarly, you can use dynamic arguments to bind a handler to a dynamic event name:
<a v-on:[eventName]="doSomething"> ... </a>In this example, when eventName’s value is "focus", v-on:[eventName] will be equivalent to v-on:focus.
Dynamic Argument Value Constraints
Dynamic arguments are expected to evaluate to a string, with the exception of null. The special value null can be used to explicitly remove the binding. Any other non-string value will trigger a warning.
Dynamic Argument Expression Constraints
Dynamic argument expressions have some syntax constraints because certain characters, such as spaces and quotes, are invalid inside HTML attribute names. For example, the following is invalid:
<!-- This will trigger a compiler warning. -->
<a v-bind:['foo' + bar]="value"> ... </a>
The workaround is to either use expressions without spaces or quotes, or replace the complex expression with a computed property.
When using in-DOM templates (i.e., templates written directly in an HTML file), you should also avoid naming keys with uppercase characters, as browsers will coerce attribute names into lowercase:
<!--
This will be converted to v-bind:[someattr] in in-DOM templates.
Unless you have a "someattr" property in your instance, your code won't work.
-->
<a v-bind:[someAttr]="value"> ... </a>
Modifiers
Modifiers are special postfixes denoted by a dot, which indicate that a directive should be bound in some special way.
For example, the .prevent modifier tells the v-on directive to call event .preventDefault() on the triggered event:
<form v-on:submit.prevent="onSubmit"> ... </form>Read the tutorial Handling Click Events with Vue. Here is another example of modifier:
<div id="modifier-prevent" class="execution"></div>
<script>
const appModifierPrevent = new Vue({
  el: "#modifier-prevent",
  data: () => ({ev: null}),
  methods: {
    setEv(ev) {
      this.ev = JSON.stringify(ev);
    }
  },
  template: `
    <div class="execution">
      <p>Default Behavior: to take you to www.google.com</p>
      <p>
        <a v-on:click.prevent="setEv" href="https://www.google.com">
          Click Me, and I show you the value of the event
        </a>
      </p>
      <p>{{ ev }}</p>
    </div>
  `
});
</script>
Shorthands
The v- prefix serves as a visual cue for identifying Vue-specific attributes in your templates.
This is useful when you are using Vue.js to apply dynamic behavior to some existing markup, but can feel verbose for some frequently used directives.
At the same time, the need for the v- prefix becomes less important when you are building a SPA, where Vue manages every template.
Therefore, Vue provides special shorthands for two of the most often used directives, v-bind and v-on:
v-bind Shorthand
<!-- full syntax -->
<a v-bind:href="url"> ... </a>

<!-- shorthand -->
<a :href="url"> ... </a>

<!-- shorthand with dynamic argument (2.6.0+) -->
<a :[key]="url"> ... </a>
v-on Shorthand
<!-- full syntax -->
<a v-on:click="doSomething"> ... </a>

<!-- shorthand -->
<a @click="doSomething"> ... </a>

<!-- shorthand with dynamic argument (2.6.0+) -->
<a @[event]="doSomething"> ... </a>
They may look a bit different from normal HTML, but : and @ are valid characters for attribute names and all Vue-supported browsers can parse it correctly.
In addition, they do not appear in the final rendered markup. The shorthand syntax is totally optional, but you will likely appreciate it when you learn more about its usage later.
Computed Properties and Watchers
Computed Properties
In-template expressions are very convenient, but they are meant for simple operations. Putting too much logic in your templates can make them bloated and hard to maintain. For example:
<div id="example">
  {{ message.split('').reverse().join('') }}
</div>
At this point, the template is no longer simple and declarative. You have to look at it for a second before realizing that it displays message in reverse. The problem is made worse when you want to include the reversed message in your template more than once.
That’s why for any complex logic, you should use a computed property.
Basic Example
<div id="example">
  <p>Original message: "{{ message }}"</p>
  <p>Computed reversed message: "{{ reversedMessage }}"</p>
</div>

<script>
var vm = new Vue({
  el: '#example',
  data: {
    message: 'Hello'
  },
  computed: {
    // a computed getter
    reversedMessage: function () {
      // `this` points to the vm instance
      return this.message.split('').reverse().join('')
    }
  }
})
</script>
Result:
Original message: “{{ message }}”
Computed reversed message: “{{ reversedMessage }}”
Here we have declared a computed property reversedMessage.
The function we provided will be used as the getter function for the property vm.reversedMessage:
console.log(vm.reversedMessage) // => 'olleH'
vm.message = 'Goodbye'
console.log(vm.reversedMessage) // => 'eybdooG'
You can open the console and play with the example vm yourself. The value of vm.reversedMessage is always dependent on the value of vm.message.
You can data-bind to computed properties in templates just like a normal property.
Vue is aware that vm.reversedMessage depends on vm.message, so it will update any bindings that depend on vm.reversedMessage when vm.message changes.
And the best part is that we’ve created this dependency relationship declaratively:
the computed getter function has no side effects, which makes it easier to test and understand.
Computed Caching vs Methods
You may have noticed we can achieve the same result by invoking a method in the expression:
<p>Reversed message: "{{ reverseMessage() }}"</p>
// in component
methods: {
  reverseMessage: function () {
    return this.message.split('').reverse().join('')
  }
}
Instead of a computed property, we can define the same function as a method. For the end result, the two approaches are indeed exactly the same.
However, the difference between methods and the computed properties is that the computed properties are cached based on their reactive dependencies.
A computed property will only re-evaluate when some of its reactive dependencies have changed.
This means as long as message has not changed, multiple access to the reversedMessage computed property will immediately return the previously computed result without having to run the function again.
This also means the following computed property will never update, because Date.now() is not a reactive dependency:
computed: {
  now: function () {
    return Date.now()
  }
}
In comparison, a method invocation will always run the function whenever a re-render happens.
Why do we need caching?
Imagine we have an expensive computed property A, which requires looping through a huge Array and doing a lot of computations.
Then we may have other computed properties that in turn depend on A.
Without caching, we would be executing A’s getter many more times than necessary! In cases where you do not want caching, use a method instead.
Computed vs Watched Property
Vue does provide a more generic way to observe and react to data changes on a Vue instance: watch properties.
When you have some data that needs to change based on some other data, it is tempting to overuse watch. However, it is often a better idea to use a computed property rather than an imperative watch callback. Consider this example:
<div id="demo">{{ fullName }}</div>var vm = new Vue({
el: '#demo',
data: {
firstName: 'Foo',
lastName: 'Bar',
fullName: 'Foo Bar'
},
watch: {
firstName: function (val) {
this.fullName = val + ' ' + this.lastName
},
lastName: function (val) {
this.fullName = this.firstName + ' ' + val
}
}
})The above code is imperative and repetitive. Compare it with a computed property version:
var vm = new Vue({
  el: '#demo',
  data: {
    firstName: 'Foo',
    lastName: 'Bar'
  },
  computed: {
    fullName: function () {
      return this.firstName + ' ' + this.lastName
    }
  }
})
Much better, isn’t it?
Computed Setter
Computed properties are by default getter-only, but you can also provide a setter when you need it:
// ...
computed: {
  fullName: {
    // getter
    get: function () {
      return this.firstName + ' ' + this.lastName
    },
    // setter
    set: function (newValue) {
      var names = newValue.split(' ')
      this.firstName = names[0]
      this.lastName = names[names.length - 1]
    }
  }
}
// ...
Now when you run vm.fullName = 'John Doe', the setter will be invoked and vm.firstName and vm.lastName will be updated accordingly.
Watchers
While computed properties are more appropriate in most cases, there are times when a custom watcher is necessary.
That’s why Vue provides a more generic way to react to data changes through the watch option.
This is most useful when you want to perform asynchronous or expensive operations in response to changing data.
The following example taken from (Macrae 2018) shows a Vue app where we have an input where a user can type in and displays on the page what was the value of the input 5 seconds ago.
<div id="watch-5-seconds-ago" class="execution">
 <input type="text" v-model="inputValue">
 <p>Five seconds ago, the input was: "{{ oldInputValue }}"</p>
</div>

<script>
new Vue({
  el: "#watch-5-seconds-ago",
  data: {
    inputValue: '',
    oldInputValue: ''
  },
  watch: {
    inputValue(newValue, oldValue) {
      const store = newValue;
      setTimeout(() => {
        this.oldInputValue = store;
      }, 5000);
    }
  }
})
</script>
Five seconds ago, the input was: “{{ oldInputValue }}”
Remember that v-model is a two-way binding for form inputs. It combines v-bind, which brings a JavaScript value from .data into the template, and v-on:input to update the JavaScript value.
The v-model directive works with all the basic HTML input types (text, textarea, number, radio, checkbox, select).
The watch entry of the Vue instance has to be an object where
- keys are expressions to watch (
inputValue) and - values are the corresponding callbacks
function(newValue, oldValue) { ... } - Callbacks are called with two arguments when their watched property is changed: the new value and the old value
- The value can also be a string of a method name, or an Object that contains additional options.
- The Vue instance will call $watch() for each entry in the object at instantiation.
Answering your Question with the yesno.wtf API
The following examples has an input where you can formulate a question.
The Vue app binds the input value to the question data variable and watches for changes of question.
The question will be sent using axios.get for an answer to https://yesno.wtf/api.
The simple Yes or No API is made for automating boolean decision making within mobile environments. API calls will return a “Yes,” “No” or “Maybe.” Returns include fun links to comical Gifs.
We use lodash method _.debounce to limit how often we access https://yesno.wtf/api, waiting until the user has completely finished typing before making the ajax request. (To learn more about the _.debounce function (and its cousin _.throttle), visit: https://lodash.com/docs#debounce
<div id="watch-example" class="execution">
  <p>
    Ask a yes/no question:
    <input v-model="question">
  </p>
  <p>{{ answer }}</p>
</div>
<!-- Since there is already a rich ecosystem of ajax libraries    -->
<!-- and collections of general-purpose utility methods, Vue core -->
<!-- is able to remain small by not reinventing them. This also   -->
<!-- gives you the freedom to use what you're familiar with.      -->
<script src="https://cdn.jsdelivr.net/npm/axios@0.12.0/dist/axios.min.js"></script>
<script src="https://cdn.jsdelivr.net/npm/lodash@4.13.1/lodash.min.js"></script>
<script>
var watchExampleVM = new Vue({
  el: '#watch-example',
  data: {
    question: '',
    answer: 'I cannot give you an answer until you ask a question!'
  },
  watch: {
    // whenever question changes, this function will run
    question: function (newQuestion, oldQuestion) {
      this.answer = 'Waiting for you to stop typing...'
      this.debouncedGetAnswer()
    }
  },
  created: function () {
    // _.debounce is a function provided by lodash to limit how
    // often a particularly expensive operation can be run.
    // In this case, we want to limit how often we access
    // yesno.wtf/api, waiting until the user has completely
    // finished typing before making the ajax request. To learn
    // more about the _.debounce function (and its cousin
    // _.throttle), visit: https://lodash.com/docs#debounce
    this.debouncedGetAnswer = _.debounce(this.getAnswer, 500)
  },
  methods: {
    getAnswer: async function () {
      if (this.question.indexOf('?') === -1) {
        this.answer = 'Questions usually contain a question mark. ;-)'
        return
      }
      this.answer = 'Thinking...'
      var vm = this
      try {
        let response = await axios.get('https://yesno.wtf/api')
        vm.answer = _.capitalize(response.data.answer)
      }
      catch (error) {
          vm.answer = 'Error! Could not reach the API. ' + error
      }
    }
  }
})
</script>
Result:
Ask a yes/no question:
{{ answer }}
In this example this bidirectional behavior of v-model constitutes a problem 😢 since each time the user press a key the input changes producing a call to the watch handler function associated to changes in question.
  watch: {
    // whenever question changes, this function will run
    question: function (newQuestion, oldQuestion) {
      this.answer = 'Waiting for you to stop typing...'
      this.debouncedGetAnswer()
    }
  },
If we instead were calling directly this.getAnwser() then there is the risk of
calling axios.get('https://yesno.wtf/api') for each pressed key. Something has to be done regarding this problem.
This is an example of how to use a lifecycle hook seen in section Lifecycle Diagram. When the Vue instance is created we use the created hook to create the debouncedGetAnswer method from the getAnswer method:
  created: function () {
    this.debouncedGetAnswer = _.debounce(this.getAnswer, 500)
  },
The call to the Lodash method _.debounce(this.getAnswer, 500)
_.debounce(func, [wait=0], [options={}])creates a debounced function that delays invoking func until after wait milliseconds have elapsed since the last time the debounced function was invoked.
That alleviates the risk to throttle the network. Furthermore, inside getAnswer we check for the presence of a ? character:
      if (this.question.indexOf('?') === -1) {
        this.answer = 'Questions usually contain a question mark. ;-)'
        return
      }
Doing nothing until the question mark appears.
In this case, using the watch option allows us
- To perform an asynchronous operation (accessing an API),
- With additional effort, to limit how often we perform that operation, and
- Set intermediary states until we get a final answer.
None of that would be possible with a computed property.
Note that you should not use an arrow function to define a watcher (e.g. searchQuery: newValue => this.updateAutocomplete(newValue)).
The reason is arrow functions bind the parent context, so this will not be the Vue instance as you expect and this.updateAutocomplete will be undefined.
In addition to the watch option, you can also use the imperative vm.$watch API.
Exercise: Examining Update Events with Computed Properties in Vue.js
Read Examining Update Events with Computed Properties in Vue.js (Hanchett and Listwon 2019), reproduce the examples and make a report in folder examining-update-events-with-computed-properties of the assignment repo.
Filters (Not supported in 3.x)
As other template languages, Vue allows the use of filters.
Filters are usable in two places: mustache interpolations and v-bind expressions (the latter supported in 2.1.0+).
Filters should be appended to the end of the JavaScript expression, denoted by the pipe symbol:
<div id="appfilter" class="execution">
  <p>Product one cost: {{ productOneCost | formatCost }}</p>
  <p>Product two cost: {{ productTwoCost | formatCost }}</p>
  <p>Product three cost: {{ productThreeCost | formatCost }}</p>
</div>
<script>
  new Vue({
    el: "#appfilter",
    data: {
      productOneCost: 998,
      productTwoCost: 2399,
      productThreeCost: 5300
    },
    filters: {
      formatCost(value) {
        return (value/100).toFixed(2)+"€";
      }
    }
  })
</script>
Product one cost: {{ productOneCost | formatCost }}
Product two cost: {{ productTwoCost | formatCost }}
Product three cost: {{ productThreeCost | formatCost }}
In Vue 3.x, filters are removed and no longer supported. Instead, the Vue authors recommend replacing them with method calls or computed properties.
At the end, a filter is only a function applied to the resulting value and thus we can use a method instead:
<div id="appFilterTransformed" class="execution">
  <p>Product one cost:   {{ formatCost(productOneCost) }}</p>
  <p>Product two cost:   {{ formatCost(productTwoCost) }}</p>
  <p>Product three cost: {{ formatCost(productThreeCost) }}</p>
</div>
<script>
  new Vue({
    el: "#appFilterTransformed",
    data: {
      productOneCost: 998,
      productTwoCost: 2399,
      productThreeCost: 5300
    },
    methods: {
      formatCost(value) {
        return (value/100).toFixed(2)+"€";
      }
    }
  })
</script>
Product one cost: {{ formatCost(productOneCost) }}
Product two cost: {{ formatCost(productTwoCost) }}
Product three cost: {{ formatCost(productThreeCost) }}
Accesing Elements Directly Using ref
There are times when we want to access the DOM element. May be we want the position of an element in the page or we are using a library that manipulates the DOM and it need to access to specific elements.
We can use ref to access the DOM element directly without having to use querySelectoror one of the other native ways to select an element of the DON.
If you use this.$ref.blahin a component, it will refer to the element in that component, not anywhere else in the document.
In the following example, taken from (LogRocket 2020), the idea is that clicking the button will set the focus on the textarea below.
To achieve it we have to have access to the textarea DOM element and for that we use the <textarea ref="editorRef" ...>
When the button is clicked the execution of the method focusEditor uses the HTMLElement.focus() method to set the focus. To get the element we use this.$refs.editorRef
<div id="appRefs" class="execution">
  <editor></editor>
</div>

<script>
Vue.component("editor", {
    template: `
        <div>
            <h2>Editor</h2>
            <button @click="focusEditor">Focus Editor</button>
            <br/>
            <textarea ref="editorRef" name="" id="" cols="30" rows="3"></textarea>
        </div>
    `,
    methods: {
        focusEditor(e) {
            this.$refs.editorRef.focus()
        }
    }
})

new Vue({
    el: "#appRefs"
})
</script>$refs are only populated after the component has been rendered, and they are not reactive.
It is only meant as an escape hatch for direct child manipulation - you should avoid accessing $refs from within templates or computed properties.
In most cases, it’s best to avoid reaching into other component instances or manually manipulating DOM elements. There are cases, however, when it can be appropriate.
Custom Directives
In addition to the built-in directives it is possible to build your own custom directives.
An example would be focusing on an input element:
<script>
    // Register a global custom directive called `v-focus`
    Vue.directive('focus', {
        // When the bound element is inserted into the DOM...
        inserted: function (el) {
            // Focus the element
            el.focus()
        }
    })
</script>

<div id="appCustomDirective" class="execution">
    <input> <br/>
    <input v-focus> <br/>
    <input>
</div>

<script>
    new Vue({
        el: "#appCustomDirective"
    })
</script>
Follow this link to see the example working.
A directive definition object can provide several hook functions (all optional) like bind or inserted. inserted is called when the bound element has been inserted into its parent node.
Transitions
Vue provides a transition wrapper component, allowing you to add entering/leaving transitions for any element or component in several contexts like in conditional rendering (using v-if)
<head>
    <script src="https://cdn.jsdelivr.net/npm/vue@2/dist/vue.js"></script>
    <style>
        .fade-enter-active,
        .fade-leave-active {
            transition: opacity .5s;
        }

        .fade-enter,
        .fade-leave-to  {
            opacity: 0;
        }
    </style>
</head>
<body>
    <div id="demo">
        <button v-on:click="show = !show">
            Toggle
        </button>
        <transition name="fade">
            <p v-if="show">hello</p>
        </transition>
    </div>

    <script>
        new Vue({
            el: '#demo',
            data: {
                show: true
            }
        })
    </script>
See it working at examples/css-transitions-2.html
The way that this works is that Vue takes the name of the transition "fade" and uses it to add CSS classes to the contained element (the paragraph <p>hello</p>) at various points through the transition.
Two types of transition enter and leave, are applied when the element is added and removed from the document, respectively. For more details see Transitioning Single Elements/Components
Customized Events
See Custom Events on the Vue.js guide.
vm.$emit( eventName, […args] )
See the Vue.js API specification on vm.$emit( eventName, […args]
It triggers an event with name eventName on the current instance.
Any additional arguments will be passed into the listener’s callback function potentially associated with the v-on.
<script>
Vue.component('magic-eight-ball', {
  data: function () {
    return {
      possibleAdvice: ['Yes', 'No', 'Maybe']
    }
  },
  methods: {
    giveAdvice: function () {
      var randomAdviceIndex = Math.floor(Math.random() * this.possibleAdvice.length)
      this.$emit('give-advice', this.possibleAdvice[randomAdviceIndex])
    }
  },
  template: `
    <button v-on:click="giveAdvice">
      Click me for advice
    </button>
  `
})
</script>

<div id="emit-example-argument">
  <magic-eight-ball v-on:give-advice="showAdvice"></magic-eight-ball>
</div>

<script>
let emitExampleArgument = new Vue({
  el: '#emit-example-argument',
  methods: {
    showAdvice: function (advice) {
      alert(advice)
    }
  }
})
</script>
The method showAdvice is triggered on the give-advice event. That is, when inside the magic-eight-ball component is executed the code this.$emit('give-advice', this.possibleAdvice[randomAdviceIndex]). The last was triggered by the user click on the button Click me for advice.
When called, the method showAdvice receives as arguments the additional arguments of the this.$emit('give-advice', this.possibleAdvice[randomAdviceIndex]): that is, the randomly generated element of the possibleAdvice array.
This mechanism allows to the root component to obtain information from the child component magic-eight-ball. See lab crguezl/vuejs-components-basics-plan-picker-component for another example.
Component Props
Prop Casing (camelCase vs kebab-case)
HTML attribute names are case-insensitive, so browsers will interpret any uppercase characters as lowercase.
That means when you’re using in-DOM templates, camelCased prop names need to use their kebab-cased (hyphen-delimited) equivalents:
Vue.component('blog-post', {
  // camelCase in JavaScript
  props: ['postTitle'],
  template: '<h3>{{ postTitle }}</h3>'
})
<!-- kebab-case in HTML -->
<blog-post post-title="hello!"></blog-post>
Again, if you’re using string templates, this limitation does not apply.
DOM Templates and String Templates
See What exactly is a DOM Template in Vue.js?
In the context of Vue, “DOM template” (commonly seen as “in-DOM template” in the rest of the Vue docs) refers to a component’s markup specified in the document body/head, as opposed to a string template or SFC template.
While DOM templates include <script type="text/html"> or <template> in the document, these two tags (along with string templates and SFC templates) are not subject to the known DOM template parsing caveats because they’re inert.
DOM templates
in-DOM template:
// index.html
<body>
  <div id="app">
    <ul>
      <li v-for="i in 5">{{ i }}</li>
    </ul>
  </div>
</body>in-DOM template with <script type="text/html">:
// index.html
<body>
  <script type="text/html" id="my-comp-template">
    <ul>
      <li v-for="i in 5">{{ i }}</li>
    </ul>
  </script>

  <div id="app">
    <my-comp></my-comp>
  </div>
</body>in-DOM template with <template>:
// index.html
<body>
  <template id="my-comp-template">
    <ul>
      <li v-for="i in 5">{{ i }}</li>
    </ul>
  </template>

  <div id="app">
    <my-comp></my-comp>
  </div>
</body>String templates
// MyComponent.js
Vue.component('my-comp', {
  template: `<ul>
               <li v-for="i in 5">{{ i }}</li>
             </ul>`
})SFC templates
// MyComponent.vue
<template>
  <ul>
    <li v-for="i in 5">{{ i }}</li>
  </ul>
</template>Creating a Transparent Base Component with Vue.js
See the article (Ball 2018), (Sieder 2019) and the repo https://github.com/crguezl/transparent-base-component for additional information.
According to the official Vue js style guide you should name a component a base component if
- It is unique to your application and you are using it in many places inside your app.
- You can name it like BaseIcon.vue or every other name starting with Base.
Sometimes you have a couple different components that are almost just native elements, but with a slight wrapper around them that adds functionality. Examples include an input field or a textarea that auto resizes.
A Component is Transparent when it behaves as closely as possible to some native component - allowing us to transparently pass through attributes, add event listeners, and more.
You usually want to have a label along with an input field (or select, radio button, etc) but you would also like to avoid to repeat the same code over and over again for multiple input fields.
Creating the WorkSpace with @vue/cli
$ npm update -g @vue/cli
$ npm install -g @vue/cli-service-global
$  pwd
/Users/casianorodriguezleon/campus-virtual/2122/learning/vue-learning/creating-a-transparent-base-component-with-vue.js
$ vue create transparent-base-component
$ cd transparent-base-component
$ tree -I node_modules
.
├── README.md
├── babel.config.js
├── package-lock.json
├── package.json
├── public
│   ├── favicon.ico
│   └── index.html
└── src
    ├── App.vue
    ├── assets
    │   └── logo.png
    ├── components
    │   └── HelloWorld.vue
    └── main.js
How v-model works under the hood
Let us remember the DOM input event.
The classical DOM input event fires when the value of an <input>, <select>, or <textarea> element has been changed.
See this example running at examples/dom-input-event.html:
    <div class="execution">
        <input placeholder="Enter some text" name="name" id="#dom-input-event"/>
        <p id="values-for-input-event"></p>
        </div>

        <script>
        const input = document.getElementById('#dom-input-event');
        const log = document.getElementById('values-for-input-event');

        input.addEventListener('input', updateValue);

        function updateValue(e) {
          console.log(e);
          log.textContent = e.target.value;
        }
        </script>
    </div>
To build this base component, we’re going to use Vue’s v-model directive.
To recap, let’s consider this simple component to remember how to use v-model:
<template>
  <div class="hello">
  <input type="text" v-model="username">  </div>
</template>

<script>
export default {
  data() {
    return {
      username: ''
    }
  }
}
</script>
In our Vue.js instance, we have the data property username and in our template we bind that variable to the input field.
According to the Vue Guide on components, v-modelon a component essentially works by passing in a value prop, and applying and input event handler.
The v-model directive binds the value of username to the value property of the input field (and therefor keep the content of that input field always in sync with the variable) and update the username variable with the new value whenever someone types something into the input field.
That is, this code:
<input v-model="searchText">is the same as
  <input
      v-bind:value="searchText"
      v-on:input="searchText = $event.target.value"
    >
    <h1>{{searchText}}</h1>
We can use this directive also for our base component, but we first need to understand, how v-model works under the hood.
By default, on a input, the v-model="variable"
- Binds the
variableyou pass to the directive to thevalueproperty of theinputand - Whenever that
inputelement emits aninputevent, thevariablewill be updated with the newvalueautomatically.
When used on a component, v-model instead does this:
<custom-input
  v-bind:value="searchText"
  v-on:input="searchText = $event"
></custom-input>
For this to actually work though, the <input> inside the component must:
- Bind the
valueattribute to avalueprop - On
input, emit its own custominputevent with the new value
This means, that in our base component we can expect
- To listen for the
inputevent and get thetarget.valueof the event and - To
$emitaninputevent back to the parent with the new$event.target.value
Building the base component
We name our component BaseInput.vue and store it in the components folder following the recomendations.
It has props label for the label of the input, and type (button, checkbox, date, … ) plus the placeholder prop.
<template>
  <div class="hello">
    <label>
      {{ label }}
      <input
        :type="type"
        :placeholder="placeholder"
        @input="$emit('input', $event.target.value)"
      >
    </label>
  </div>
</template>

<script>
export default {
  name: "BaseInput",
  props: {
    label: String,
    type: String,
    placeholder: String
  }
};
</script>
We listen for the input event and emit another input event back to the parent component in order to let the parent v-model directive update the corresponding variable accordingly.
This way, our BaseInput component is a transparent component, which can be used with v-model.
Here is our main App.vue component:
<template>
  <div id="app">
    <BaseInput label="Username" type="text" placeholder="Username" v-model="username"/>
    <BaseInput label="Password" type="password" placeholder="********" v-model="password"/>

    <hr>
    {{ username }} - {{ password }}
  </div>
</template>

<script>
import BaseInput from "./components/BaseInput";

export default {
  name: "App",
  components: {
    BaseInput
  },
  data() {
    return {
      username: "",
      password: ""
    };
  }
};
</script>

<style>
#app {
  font-family: "Avenir", Helvetica, Arial, sans-serif;
  -webkit-font-smoothing: antialiased;
  -moz-osx-font-smoothing: grayscale;
  text-align: center;
  color: #2c3e50;
  margin-top: 60px;
}
</style>
Exercise: Vuejs Fundamentals
Follow the tutorial at (VueSchool 2018), reproduce the examples and leave the results in folder vuejsfundamentals of the assignment repo
The source is at repo vueschool/vuejs-fundamentals. The video seems to correspond to this commit: 844bdf75f6a17647e202813cf574a03a61541edf
References
The virtual DOM (VDOM) is a programming concept where an ideal, or virtual, representation of a UI is kept in memory and synced with the “real” DOM by a library like Vue or React↩︎